
How to use the Canon XA10 Video Camera
Camera and tripod safety procedures and handling
- Don’t hold the camera by the shotgun mic, the lens hood or the LCD screen, but always by the handle.
- Don’t leave the tripod closed leaning against the wall, it will eventually crash to the floor.
- Don’t leave the camera on the tripod if you’re not shooting.
- Don’t leave cables around, somebody might trip on them, damage the camera, or get hurt.
What’s in the case
- Canon XA10 video camera with shotgun microphone, battery and lens cap
- 16GB SDHC card (already in the camera)
- Power adapter/charger with two cables
- White balance card
- Shoulder strap
Checking & Charging the Battery
- Before shooting, make sure the battery is fully charged.
- The battery lasts for about 90 minutes.
- When the camcorder is off, press the BATT. INFO button to display the charge status of the battery and remaining recording time.
- When the camcorder is on, select FUNC. > MENU > settings tab > Battery Info
- There’s a limited amount of high capacity battery packs (BP-827) that last about 260 mins.
- The battery doesn’t charge if the camcorder is on.
Memory cards
- Use only SDHC/ SDXC cards that are class 6 to 10.
- The bigger the better (at least 16GB)

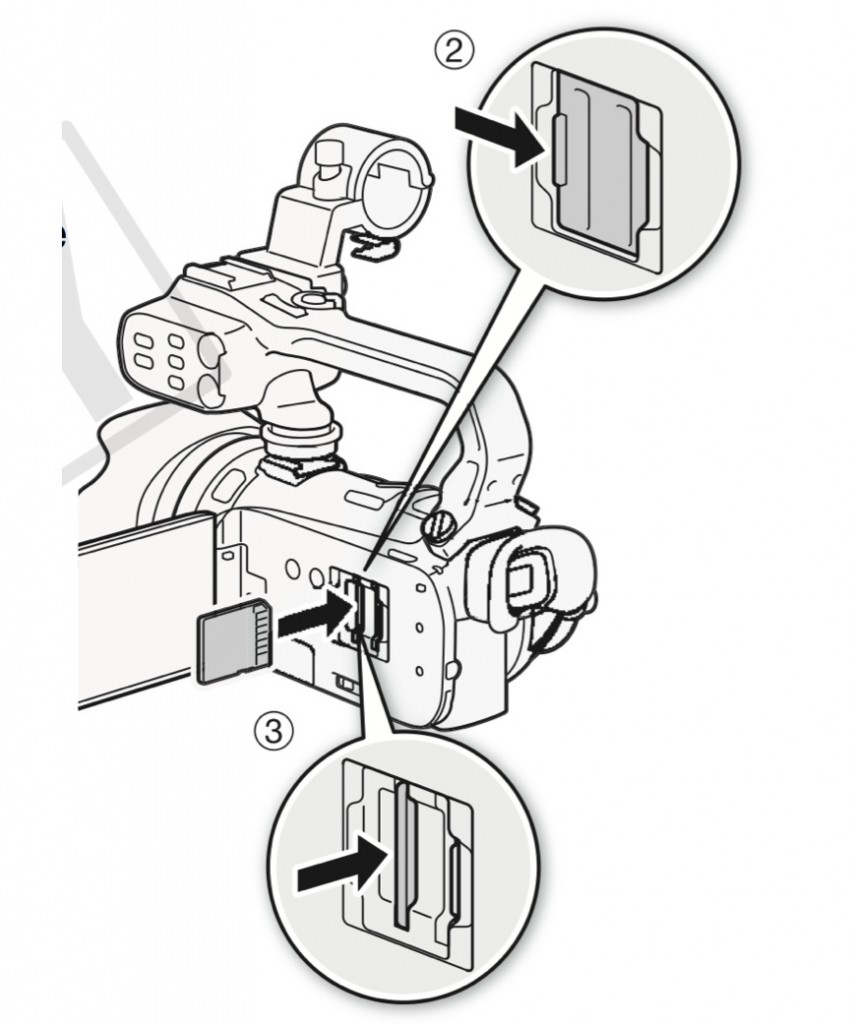
Inserting & Ejecting the Memory Card
- Turn off the camera
- Slide the card holder open
- Push the card all the way in with cut corner on top
- To eject, push the card in and it will pop out
Using the Memory Card
- Selecting the memory for the recordings: FUNC. > MENU > Movie Tab > Rec Media for Movies > select A or B DON’T SELECT THE INTERNAL MEMORY!
- Relay recording: press Relay Recording
- Double slot recording: press Double Slot Rec
Using the Memory Card II
While the ACCESS indicator is on or flashing:
- Do not open the double memory card slot cover.
- Do not disconnect the power source or turn off the camcorder.
- Do not change the camcorder’s operating mode. Failing to do so may result in permanent data loss or damage to the memory card!
Using the Memory Card III
- Initializing the memory card: FUNC. > MENU > Settings Tab > Initialize > select memory card > Initialize > Yes
- To avoid problems with the card it’s a good idea to press Complete Initialization USE THE INITIALIZE MENU WITH CARE!
Tripod
- Attach the tripod plate to the bottom of the camera
- Attach the camera to the tripod head
- Extend and lock the tripod legs
- Pan left and right
- Tilt up and down
- Always remember to lock the tripod parts you unlock!
Preparing to Record
- Attach a charged battery pack to the camcorder
- Turn on the camcorder
- Flip the touchscreen open
- Select the memory for recording
- Remove the lens cap.
- If you need to use the viewfinder, pull it out.
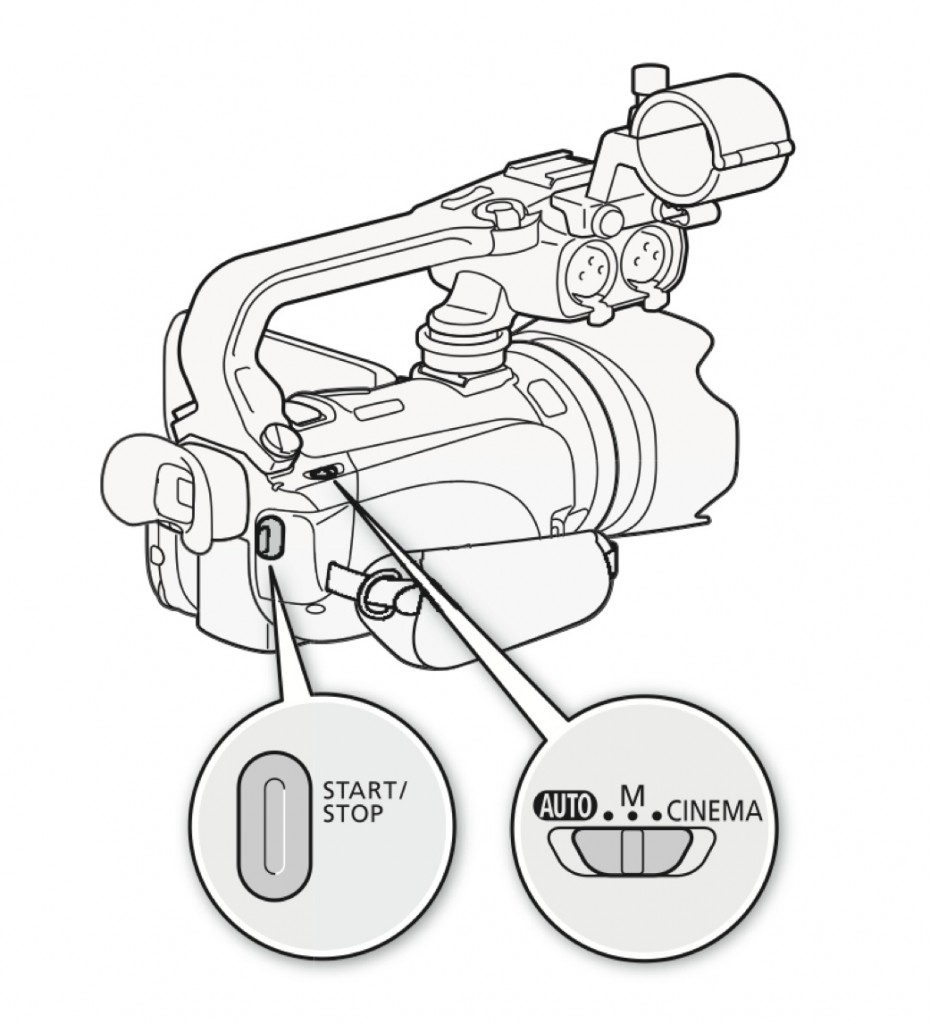
Recording in auto mode
- Set the mode switch to AUTO
- Turn on the camcorder
- Press START/STOP to begin recording
- Press START/STOP again to stop recording 
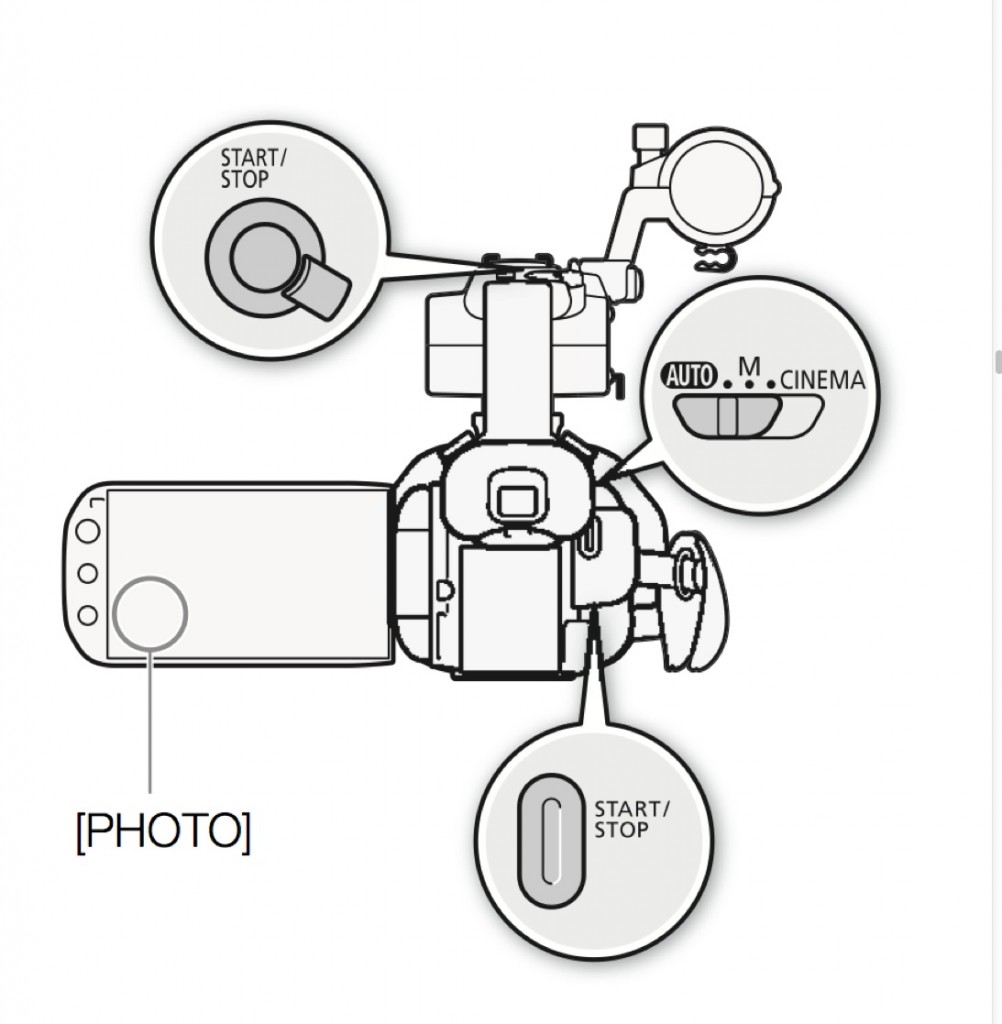
Recording in M (Manual) mode
- Set the mode switch to M
- Turn on the camcorder
- Press FUNC. on the screen and select the recording mode: – P (Programmed Auto Exposure) – Tv (Shutter-Priority Auto Exposure) – Av (Aperture-Priority Auto Exposure) – M (Manual Exposure)
Using the Manual Exposure
- You can change aperture and shutter speed independently
- You can adjust the Gain
- You can set Zebras to better evaluate exposure
Aperture and Shutter Speed
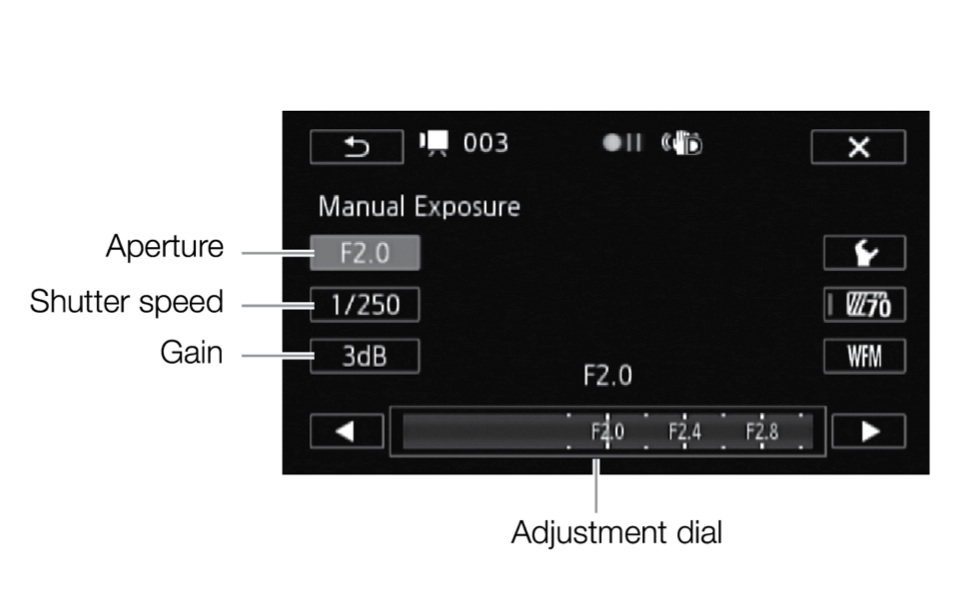
- In manual mode, they allow you to change the amount of light reaching the sensor, eg change the exposure
- Iris changes the amount of light coming through the lens.
- Shutter speed changes the way moving objects look: if too slow (usually below 1/30s) moving object leave a light trail
Gain and Zebra Pattern
- Gain allows you to “turn up the volume” on the exposure, but introduces digital noise in the image
- Zebras show you when the brightness in some areas of the image reach 70% or 100% brightness. This allows you to s4ll have some detail without “burning” the area
- FUNC. > MENU > movie tab > Recording Mode
- For best results, use MXP or FXP recording modes
Selecting the Frame Rate
- FUNC. > MENU > movie tab > Frame Rate
- Touch the desired frame rate and then press X
- For optimal results, use the PF30 (best for web) or 60i (best for TV broadcast) settings
Settings and Menus Automatic vs Manual
- Use auto only when you have no other choice
- Manual mode gives you more control and higher quality footage
Zooming
- To zoom in/out, use the zoom lever on the camcorder’s body or the zoom rocker on the handle
- To change zoom speed: FUNC. > MENU > camera tab > Zoom Speed Level
- Select Fast, Normal or Slow and press X
- From this menu, you can also change the rocker and lever zoom speed: VAR (variable) and CONST (constant)
White balance
- Select FUNC. > WB
- Choose one of the presets for your lighting conditions or
- Press Set 1 or Set 2 to set a custom white balance
- Point the camcorder to the white card so that it fills the whole screen, then press Set WB. Hold it un4l the WB symbol stops flashing
Image Stabilizer
- FUNC. > Image Stabilizer > Choose the settings: – Dynamic: if shooting handheld – Standard: if shooting handheld with some support – Off: if shooting on a tripod
- Use it only if shooting handheld
- If using a tripod turn it off because it slightly degrades the picture quality
Using the viewfinder
- Pull the viewfinder out to use it or it won’t work
- If you only want to use the viewfinder without the screen, you can close it. Just be careful not to close it if you have headphones plugged in, you might break the screen!
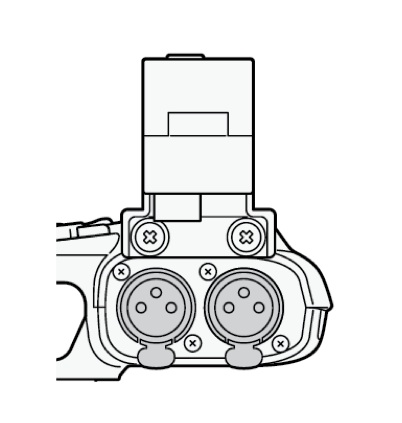
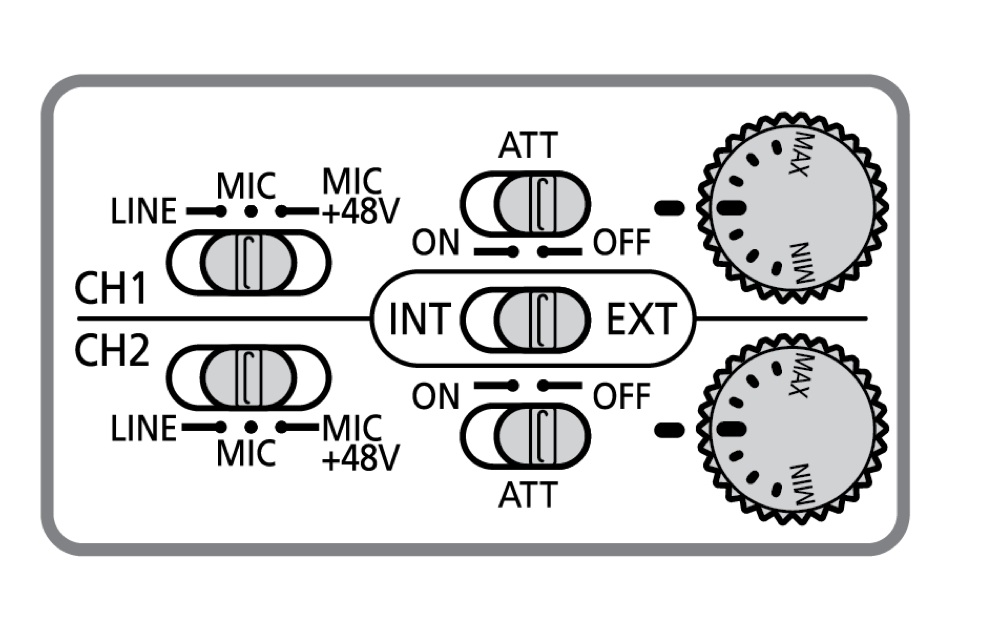
Attaching an external microphone
- To use the internal mic: set the Audio Input Switch to INT
- To use the shotgun mic: set the Audio input switch to EXT and the CH1 XLR input switch to MIC +48 You can’t record from the internal and external mic at the same time!
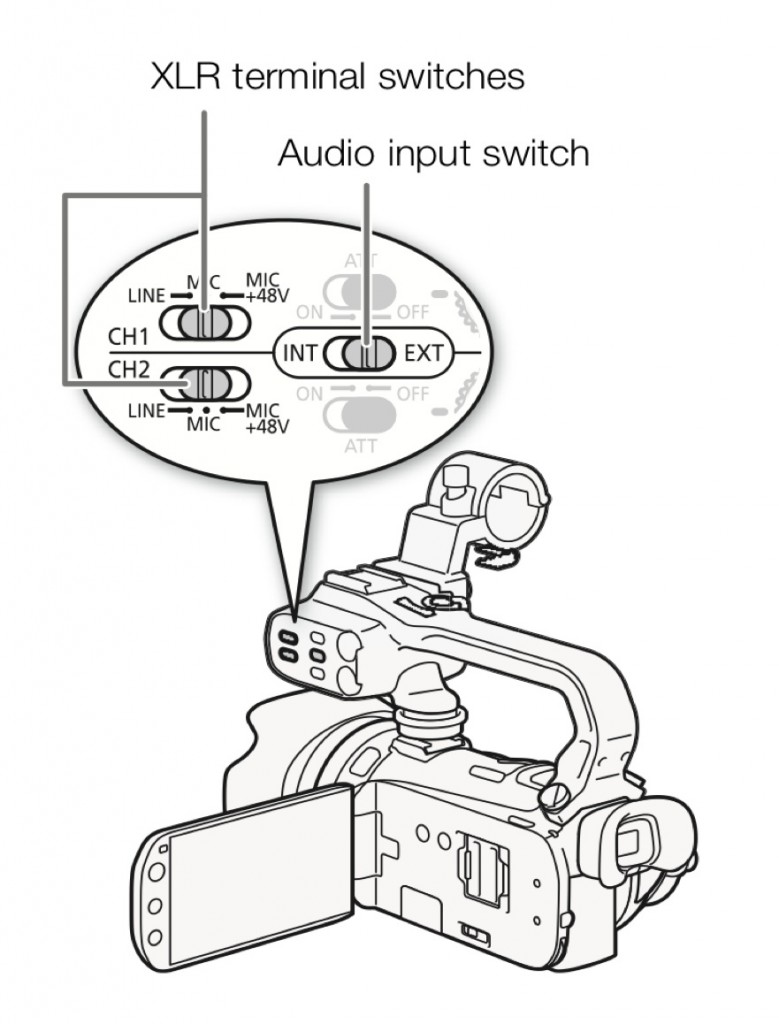
Attaching the reporter mic
- Turn off the camcorder VERY IMPORTANT!! Verify that the CH2 XLR input switch is set to MIC and NOT MIC +48. Failing to do so could seriously damage the mic!
- Connect the mic to the CH2 XLR plug
- Turn on the camcorder.
Setting up the camera for recording
- FUNC. > MENU > camera menu > XLR Rec Channel > CH1
- FUNC. > MENU > Audio Output CH > CH1/2
- Make sure the mics work properly by tapping gently on them and looking at the audio level meters on the screen
Connecting headphones
- FUNC. > MENU > settings tab > AV/headphones > Headphones Check this first or you might risk of damaging your headphones!
- Connect the headphones to the headphones/AV plug
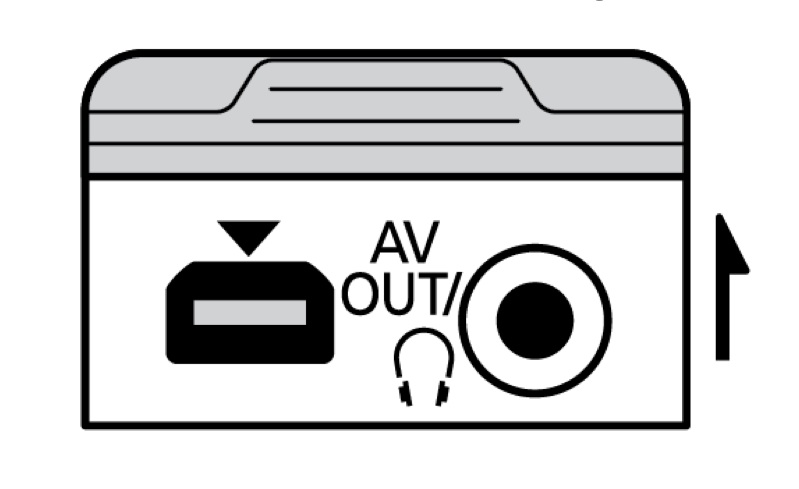
- Change the Headphones Volume: FUNC. > MENU > settings tab > Volume ALWAYS use headphones when recording audio.
Audio settings and levels
- Check the audio level, they should never go all the way to zero to avoid distortion
- Adjust the sound level dials
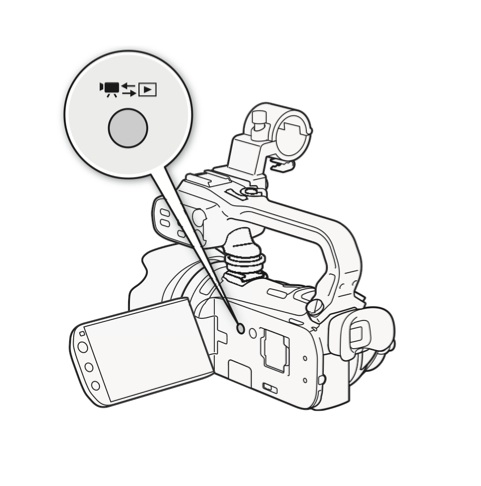
Watching your recordings in-camera
- Press

- Swipe your finger on the screen to find the clip
- Touch the clip to play it
About the infrared switch
- When on, the infrared switch allows you to shoot in complete darkness
- Don’t point the lens to bright (e.g. the sun) or very hot objects, there’s a risk of damaging the sensor!
- Don’t use it in broad daylight!
For more help:
- Ask staff at the Media Cage
- Download the Canon XA10 manual at http://usa.canon.com/cusa/consumer/ products/camcorders/ professional_camcorders/xa10
- Ask me! Room GH410